/* single use colors */
body {background-color:#FFFFFF;color:#000000;}
footer {background-color:#555658;color:#FFFFFF}
footer a {color:#FFFFFF;}
a {color: rgb(0, 0, 238);}
/* IE11 workarounds */
aside, #news, #panel0, #panel1, #panel2, #panel3, summary, main form {background-color: #F3F2F1; color: #000000;}
#navbar, #menu li, #menu li a, ul li:hover ul.subNav, ul li:focus ul.subNav {background-color: #287184; color:#FFFFFF;}
#mobile-main-menu, .chevron {background-color: #287184; color:#FFFFFF; margin-left:0 !important;}
details {border: 2px solid #F3F2F1;}
th, td {border-bottom: 1px solid #B1B4B6;}
main#container a:hover {color:#4C2C92 !important}
input[type=button], input[type=submit] {border:0; font-weight:bold; padding:10px;color: var(--button-color);background-color: var(--button-bg-color);}
input[type=button]:hover, input[type=submit]:hover {background-color: var(--button-bg-hover-color);color: var(--button-color);}
/* end of site specific colors */
4. You will now see both your site key and secret key. Take a note of the secret key as you will need this for the next part.
3. Create the JavaScript
1. Navigate to assets > js.
2. Select Create folder, name it the same name of your site (e.g. DGDT) and Publish it.
3. In the folder, select Create text file and insert the following:
Name: main.js
Mime Primary Type: text
Mime Sub-type: javascript
Syntax: JS
4. Copy and paste the JavaScript below.
document.getElementById("mobile-main-menu").addEventListener("click", function(e){

					let mmm = document.getElementById("mobile-main-menu");

					mmm.classList.toggle("close");

					let mobileMenu = document.getElementById('nav');

					mobileMenu.classList.toggle("navHide");

					mobileMenu.classList.toggle("navShow");

					});


					var topMenus = document.querySelectorAll('.menu-item > a');

					for (var i = 0; i < topMenus.length; i++) {

					topMenus[i].addEventListener('focus', function(event) {

					var subNavs = document.querySelectorAll('.showSubNav');

					for (var j = 0; j < subNavs.length; j++) {

					subNavs[j].classList.remove('showSubNav')

					}

					var opened = document.querySelectorAll('.opened');

					for (j = 0; j < opened.length; j++) {

					opened[j].classList.remove('opened')

					}

					var openMenus=document.querySelectorAll('[aria-expanded="true"]');

					for (j = 0; j < openMenus.length; j++) {

					openMenus[j].setAttribute("aria-expanded", false);

					}

					});

					}


					var subMenus = document.querySelectorAll('a.chevron');

					for (var i = 0; i < subMenus.length; i++) {

					subMenus[i].addEventListener('click', function(event) {

					event.target.classList.toggle("opened");

					event.target.setAttribute("aria-expanded", true);

					var targetElement = event.target.nextElementSibling;

					var subMenu=targetElement.children[0];

					targetElement.classList.toggle("opened");

					targetElement.classList.toggle("showSubNav");

					targetElement.focus();

					});

					}

					window.addEventListener("keydown", function(event) {

					var keyPressed = event.which;

					if (keyPressed == 13 || keyPressed == 32 || keyPressed == 40) {

					var focused = document.activeElement;

					if (focused.getAttribute('aria-haspopup')) {

					focused.setAttribute("aria-expanded", true);

					var targetElement = focused.nextElementSibling;

					var subMenu=targetElement.children[0].children[0];

					targetElement.classList.toggle("opened");

					targetElement.classList.toggle("showSubNav");

					subMenu.focus();

					}

					}

					});
5. Save the text file and Publish it.
6. In the folder, select Create text file and insert the following:
Name: cookie-control-v9.js
Mime Primary Type: text
Mime Sub-type: javascript
Syntax: JS
7. Copy and paste the JavaScript below.
var cc_config = {

					position: "LEFT",

					apiKey: '0000000000000000000000000000000000000000',

					product: 'PRO_MULTISITE',

					initialState: "NOTIFY",

					necessaryCookies: ['JSESSIONID', 'HASQA'],

					optionalCookies: [

					{

					name : 'analytics',

					label: 'Analytical Performance Cookies',

					description: 'Counts the number of visitors and how visitors move around the website (does not collect personal information).',

					cookies: [

					// Google Analytics

					'_utma', '_utmb', '_utmc', '_utmt', '_utmz', '_ga', '_gat', '_gid'

					],

					initialConsentState: "on",

					onAccept : function(){


					localStorage.removeItem("analyticsRevoked");


					// Google Tag Manager

					(function(w,d,s,l,i){w[l]=w[l]||[];w[l].push({'gtm.start':

					new Date().getTime(),event:'gtm.js'});var f=d.getElementsByTagName(s)[0],

					j=d.createElement(s),dl=l!='dataLayer'?'&l='+l:'';j.async=true;j.src=

					'https://www.googletagmanager.com/gtm.js?id='+i+dl;f.parentNode.insertBefore(j,f);

					})(window,document,'script','dataLayer','GTM-0000000');

					// End Google Tag Manager

					},

					onRevoke: function(){

					// Disable Google Analytics

					window['ga-disable-UA-00000000-1'] = true;

					// End Google Analytics


					// Remember on Revoke

					localStorage.setItem("analyticsRevoked", "true");

					}

					}

					],


					text : {

					notifyTitle: 'We use cookies to give you the best possible experience...',

					notifyDescription: 'If you don\'t want to accept cookies you can change preferences',

					title: 'This site uses cookies.',

					intro: 'Some of these cookies are essential, while others help us to improve your experience by providing insights into how the site is being used.',

					necessaryTitle : 'Necessary Cookies',

					necessaryDescription : 'Required for the operation of the website.',

					thirdPartyTitle : 'Warning: Some cookies require your attention',

					thirdPartyDescription : 'Consent for the following cookies could not be automatically revoked. Please follow the link(s) below to opt out manually.',

					acceptRecommended: 'Accept'

					},

					statement : {

					description: 'For more information visit our',

					name : 'Cookies Statement',

					url: 'https://www.sqa.org.uk/sqa/1432.html',

					updated : '24/05/2019'

					},

					branding : {

					alertBackground: "#28828C",

					fontColor: "#FFFFFF",

					backgroundColor: "#3E3E3F",

					toggleText: "#000000",

					toggleColor: "#28828C",

					toggleBackground: "#FFFFFF",

					buttonIcon: null,

					buttonIconWidth: "64px",

					buttonIconHeight: "64px",

					removeIcon: false,

					removeAbout: false,

					acceptBackground: "#FFFFFF",

					acceptText: "#000000",

					rejectBackground: "#000000",

					rejectText: "#FFFFFF"

					},

					accessibility : {

					outline: true

					}

					};


					CookieControl.load( cc_config );
Change the parts in yellow to refelct the style of your site. Follow the instructions in section 21. Implement Google Tag Manager to update the section highlighted in teal.
8. Save the text file and Publish it.
9. Navigate to assets > scripts.
10. Select Create folder, name it the same name of your site (e.g. DGDT) and Publish it.
11. In the folder, select Create text file and insert the following:
Name: contact.js
Mime Primary Type: text
Mime Sub-type: javascript
Syntax: JS
12. Copy and paste the JavaScript below.
var ccc = Packages.ccc;
var resources = services.getResources();
// Form fields
var name = request.getParameter("name");
var email = request.getParameter("email");
var enquiry = request.getParameter("enquiry");
var comments = request.getParameter("comments");
// Validation
var errors = new java.util.ArrayList();
if (name==null || 0==name.trim().length()) {
errors.add("<a href='#name'>Please enter your name</a>\n");
}
if (email==null || 0==email.trim().length()) {
errors.add("<a href='#email'>Please enter your e-mail address</a>\n");
} else if (!ccc.api.types.EmailAddress.isValidText(email)) {
errors.add("<a href='#email'>Please enter your e-mail address</a>\n");
}
if (enquiry==null || 0==enquiry.trim().length()) {
errors.add("<a href='#enquiry'>Please select your enquiry</a>\n");
}
if (comments==null || 0==comments.trim().length()) {
errors.add("<a href='#comments'>Please enter your comments</a>\n");
}
// reCAPTCHA v3
var secret = "0000000000000000000000000000000000000000";
var userResponse = request.getParameter("g-recaptcha-response");
var remoteip = request.getHeader("X-Forwarded-For");
if (remoteip == null || remoteip.length() == 0 || "unknown".equalsIgnoreCase(remoteip)) {
remoteip = request.getHeader("X-Civic-Real-IP");
}
if (remoteip == null || remoteip.length() == 0 || "unknown".equalsIgnoreCase(remoteip)) {
remoteip = request.getRemoteAddr();
}
var body = "secret=" + secret + "&remoteip=" + remoteip + "&response=" + userResponse;
var mt = new Packages.ccc.api.types.MimeType("application", "x-www-form-urlencoded")
var resp = Packages.ccc.commons.HTTP.post("https://www.google.com/recaptcha/api/siteverify", body, mt, 10000);
var captchaResponse = new org.json.JSONObject(resp);
if (!captchaResponse.getBoolean("success")) {
errors.add("We're having problems with reCAPTCHA - " + captchaResponse.getString("error-codes"));
} else {
var score = parseFloat(captchaResponse.getString("score"));
if (captchaResponse.getString("action") == "validate_captcha" && score > 0.3) {
// errors.add("You are a human");
} else {
errors.add('There is a problem submitting your form. Please contact <a href="mailto:adr@sqa.org.uk">DGDT</a> quoting reference v3'+score);
}
}
// End reCAPTCHA v3
if (0==errors.size())
{
var fromAddress = new ccc.api.types.EmailAddress("no-reply@apps.sqa.org.uk");
var toAddress = new ccc.api.types.EmailAddress("adr@sqa.org.uk");
Change the parts in yellow to refelct the style of your site. Refer to Google reCAPTCHA and update the section highlighted in teal with your secret key.
13. Save the text file and Publish it.
4. Create the includes
In this example, the html header, the header and footer sections are consistent across all pages so these are candidates for includes, but in other cases, you may want to create a left or right include depending on the design of the site.
1. Navigate to assets > includes.
2. Select Create folder, name it the same name of your site (e.g. DGDT) and Publish it.
3. In the folder, select Create text file and include the following:
File Name: inc_header
Mime Primary Type: text
Mime Sub-type: html
Syntax: HTML
4. Copy and paste the HTML below.
4. Please refer to https://www.swqr.org.uk/web-team/boilerplate/index.html#includes.
<!-- Google Tag Manager (noscript) -->

					<noscript><iframe title="Google Tag Manager" src="https://www.googletagmanager.com/ns.html?id=GTM-0000000" height="0" width="0" style="display:none;visibility:hidden"></iframe></noscript>

					<!-- End Google Tag Manager (noscript) -->

					<ul class="skiplinks">

					<li><a href="#container">Skip to content</a></li>

					<li><a href="#nav">Skip to main navigation</a></li>

					<li><a href="/DGDT/accessibility">Skip to accessibility page</a></li>

					</ul>

					<header>

					<div id="top">

					<span id="topleft">

					<a href="/DGDT/Home">

					<span class="logo">Logo title</span>

					</a>

					</span>

					<div id="topright">

					<form id="searchform" style="float:right;" action="/DGDT/Search-results" method="get" enctype="multipart/form-data">

					<label for="q"><span class="visuallyhidden">Search</span><input id="q" name="q" size="30" placeholder="Enter search term" /></label>

					<input type="submit" id="submit" value="Search" title="Search" />

					</form>

					</div>

					</div>

					<div id="navbar">

					<div id="mobile-main-menu">

					<span>Main Menu</span>

					<div id="bars">

					<div class="bar1"></div>

					<div class="bar2"></div>

					<div class="bar3"></div>

					</div>

					</div>

					<nav id="nav" class="navHide">

					<ul id="menu">

					##set ($startLevel = 1)

					##set ($endLevel = 1)

					##menuTag()

					## Get base level menu items

					#set ($menuPages = $resources.list($resources.resourceForPathSecure("/DGDT/").getId(), null, null, null, "true", null, null, "true", "manual", $enums.of("ccc.api.types.SortOrder", "ASC"), 1, 100).getElements())

					## Iterate through them, and if some are folders, search for menu items under them

					#foreach ($menuPageRS in $menuPages)

					#if ($menuPageRS.getId().equals($resource.getId()) || $menuPageRS.getId().equals($resource.getParent()))

					#set ($extraClass = "current")

					#else

					#set ($extraClass = "")

					#end

					## We found a folder, so retrieve all menu items under it for the drop down menu.

					#if ($menuPageRS.getType().toString().equals("FOLDER"))

					#set ($thisMenuPages = $resources.list($menuPageRS.getId(), null, null, null, "true", null, null, "true", "manual", $enums.of("ccc.api.types.SortOrder", "ASC"), 1, 100).getElements())

					#if ($thisMenuPages.size() > 0)

					#foreach ($thisMenuPageRS in $thisMenuPages)

					#if ($resource.getParent().equals($thisMenuPageRS.getId()))

					#set ($parentExtra = "open")

					#break

					#else

					#set ($parentExtra = "")

					#end

					#end

					<li class="menu-item $!extraClass $!parentExtra">

					<a href="javascript:void(0);" class="chevron" aria-haspopup="true" aria-expanded="false">$menuPageRS.getName().replaceAll("_"," ").replaceAll("-"," ")</a>

					<ul class="subNav">

					#foreach ($thisMenuPageRS in $thisMenuPages)

					#if ($resource.getParent().equals($thisMenuPageRS.getId()))

					<li class="current">

					$thisMenuPageRS.getName().replaceAll("_"," ").replaceAll("-"," ")

					</li>

					#else

					<li class="notcurrent">

					<a href="$thisMenuPageRS.getAbsolutePath()">$thisMenuPageRS.getName().replaceAll("_"," ").replaceAll("-"," ")</a>

					</li>

					#end

					#end

					</ul>

					</li>

					#else

					#if ($resource.getParent().equals($menuPageRS.getId()))

					<li class="$!extraClass">

					$menuPageRS.getName().replaceAll("_"," ").replaceAll("-"," ")

					</li>

					#else

					<li class="$!extraClass">

					<a href="$menuPageRS.getAbsolutePath()">$menuPageRS.getName().replaceAll("_"," ").replaceAll("-"," ")</a>

					</li>

					#end

					#end

					#else

					#if ($menuPageRS.getId().equals($resource.getId()) || $menuPageRS.getId().equals($resource.getParent()))

					<li class="menu-item $!extraClass">

					<span class="spanMenu">$menuPageRS.getName().replaceAll("_"," ").replaceAll("-"," ")</span>

					</li>

					#else

					<li class="menu-item $!extraClass">

					<span class="spanMenu"><a href="$menuPageRS.getAbsolutePath()">$menuPageRS.getName().replaceAll("_"," ").replaceAll("-"," ")</a></span>

					</li>

					#end

					#end

					#end

					</ul>

					</nav>

					</div>

					</header>
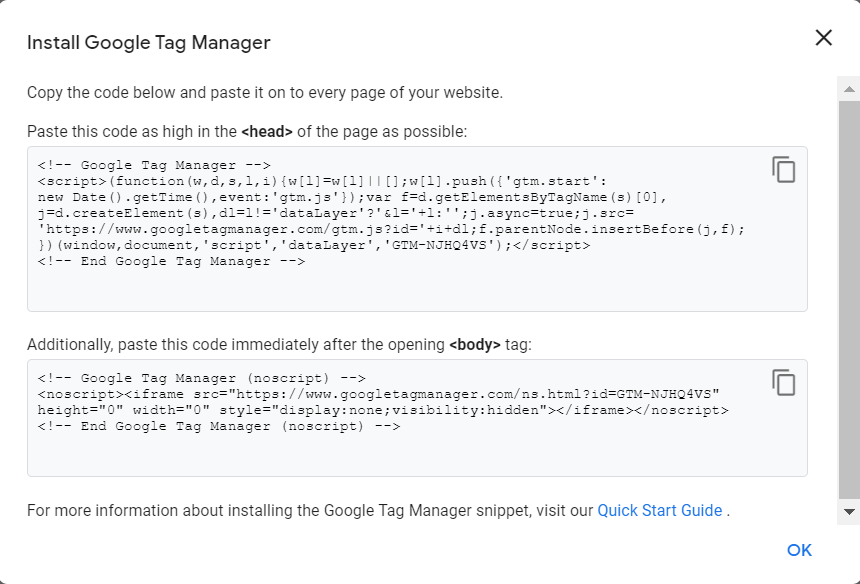
5. Change the parts in yellow to reflect your site. Change GTM-0000000 to reflect your Container ID. Follow the instructions in section 21. Implement Google Tag Manager.
6. Save the text file and Publish it.
7. Select Create text file in the same folder and include the following:
8. Change the parts in yellow to point to the includes files you created.
9. Save the template and Publish it.
6. Create a news page template
1. Navigate to assets > templates.
2. In the folder where you created the general page template, create a template for the news page and insert the following:
Name: e.g. DGDT-news
Mime Primary Type: text
Mime Sub-type: html
3. Click Next.
4. In the Definition XML window, replace <fields></fields> with:
<fields>

					<field name="header" type="text_field" title="Header" description="Header for the main section." />

					<field name="summary" type="html" title="Summary" description="Summary for the main section." />

					<field name="content" type="html" title="Content" description="Content of the main section." />

					</fields>
5. Click Next.
6. In the Body window, copy and paste the following:
<script>
var selectElement = document.getElementById("enquiry")
var pElement = document.getElementById("enquiryInfo")
selectElement.addEventListener('change', function() {
var index = selectElement.selectedIndex;
if (index == 0) {
pElement.innerHTML = "";
}
else if (index == 1) {
pElement.innerHTML = "Option 1";
}
else if (index == 2) {
pElement.innerHTML = "Option 2";
}
else if (index == 3) {
pElement.innerHTML = "Option 3";
}
})
</script>
<!-- Google reCAPTCHA -->
<script src="https://www.google.com/recaptcha/api.js?render=0000000000000000000000000000000000000000"></script>
<script>
function validateAndSubmitForm() {
grecaptcha.ready(function() {
grecaptcha.execute('0000000000000000000000000000000000000000', {action: 'validate_captcha'}).then(function(token) {
document.getElementById("g-recaptcha-response").value = token;
HTMLFormElement.prototype.submit.call(document.getElementById("FORM_ID"));
});
});
}
</script>
<!-- End Google reCAPTCHA -->
</body>
</html>
7. Change the parts in yellow. Refer to Google reCAPTCHA and update the section highlighted in teal with your site key.
8. Save the template and Publish it.
12. Create a site info page using a template
1. Select Create folder in the content directory with the name of your site (e.g. DGDT) and Publish it.
2. Select and select Choose template and select the general template you created.
This means that when you create a page inside your new folder, it will automatically adopt the general template. You only need to choose a template for a non-normal page (e.g. home, search).
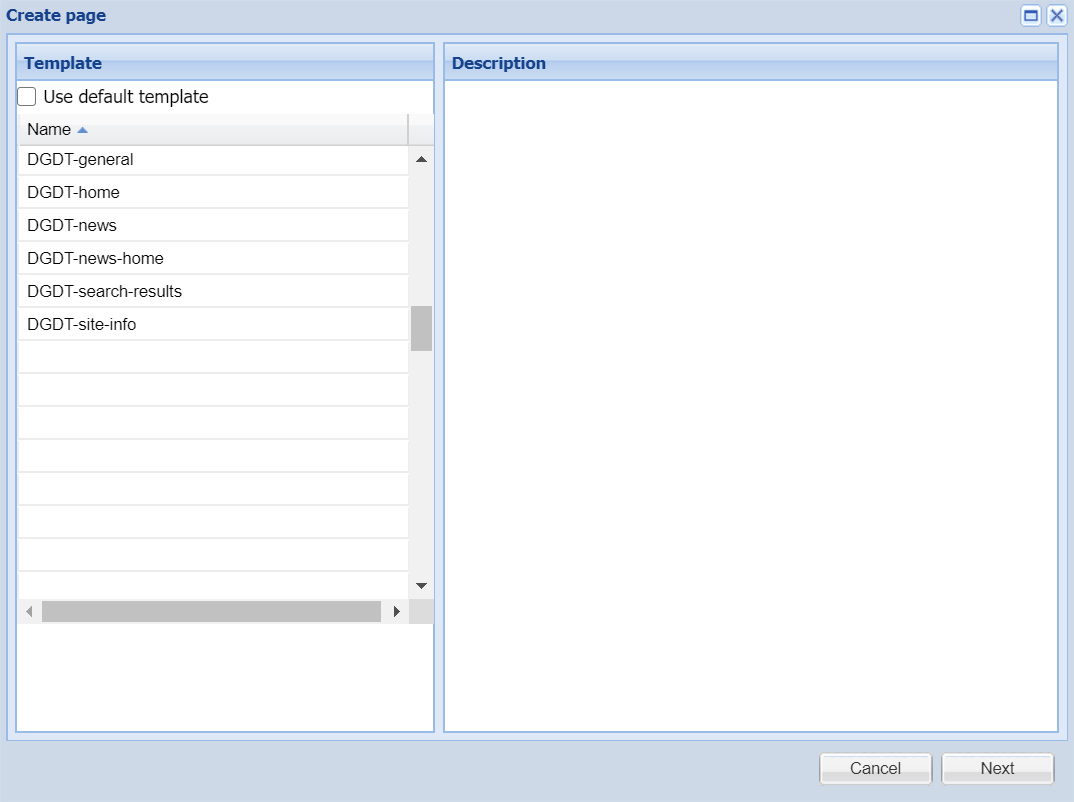
3. In the folder you created with the name of your site, select Create page.
Notice the Use default template is checked? That means that the general template will be adopted. If you decide you don't want to adopt the general template for this particular page, you can select another template.
See the 6 templates we have created?
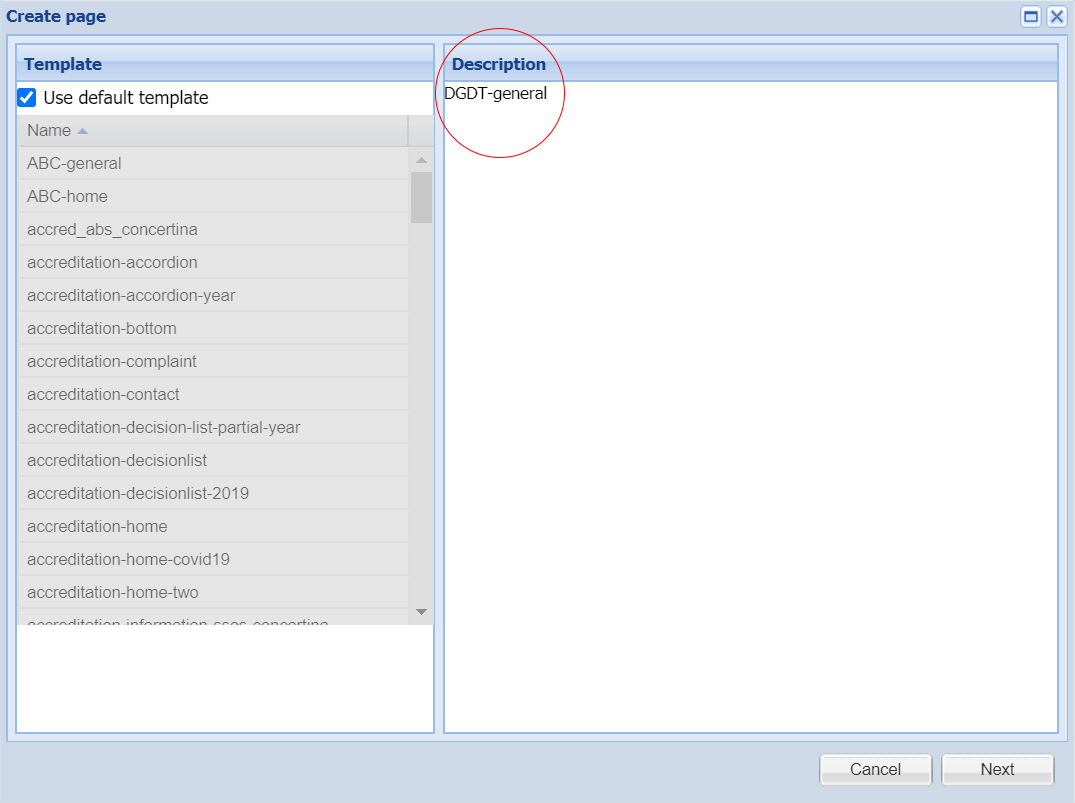
4. Uncheck the Use default template box and select DGDT-site-info.
This will allow us to feature related information across multiple pages on our site.
5. Populate the Related box.
6. Save the page and Publish it.
You should have something like this:
13. Create a general page using a template
1. In the folder you created with the name of your site, select Create page.
2. Ensure Use default template is checked.
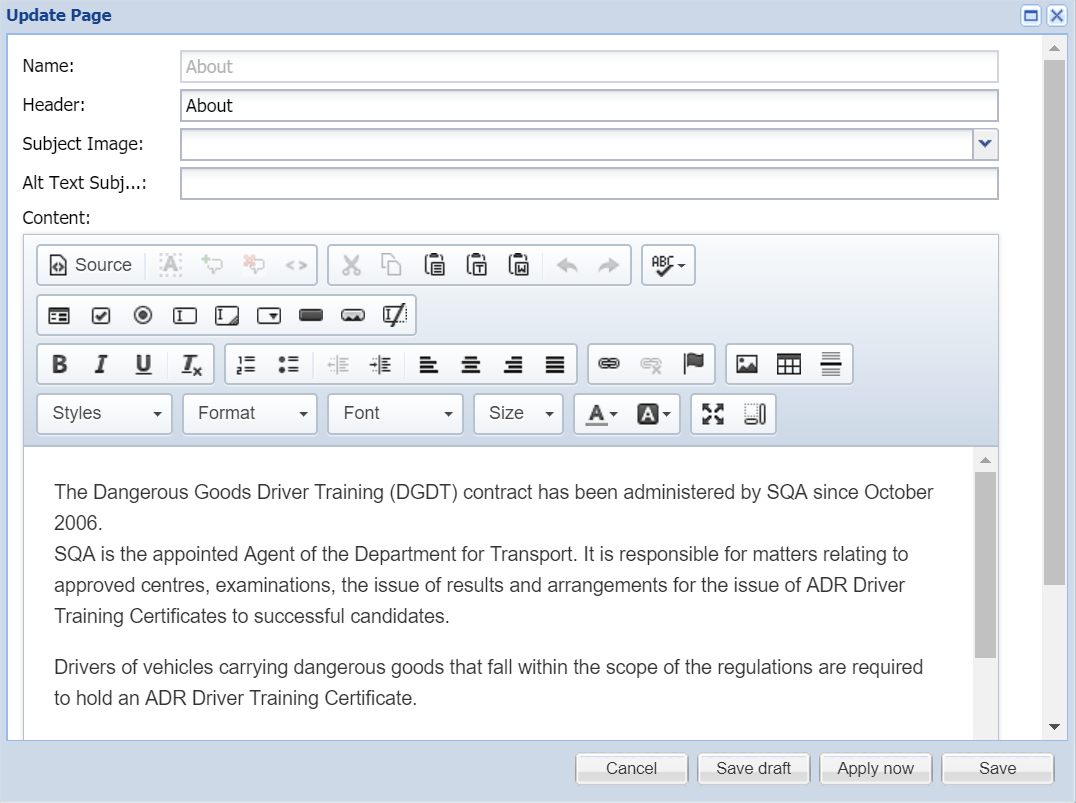
3. Populate the Content box.
4. Save the page and Publish it.
14. Create a news article page using a template
1. In the folder you created with the name of your site, select Create folder called News and Publish it.
Folders within a site folder are used to create sub menus on the main navigation. Any pages that sit inside the folder will appear in the sub menu if the Add to menu option is set to true.
2. Inside the News folder, select Create page.
3. Uncheck the Use default template box and select DGDT-news.
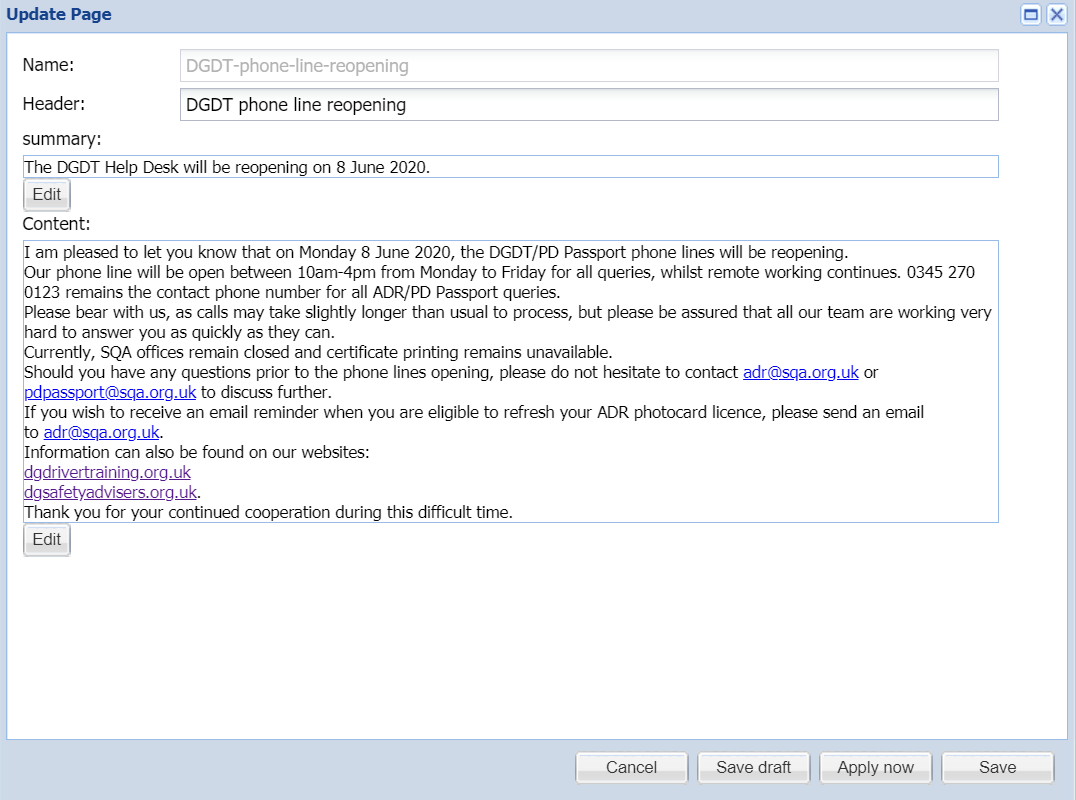
4. Populate the Summary and Content box.
5. Save the page and Publish it.
15. Create a news home page using a template
1. Repeat the instructions in step 14. Create a news article page using a template.
2. Uncheck the Use default template box and select DGDT-news-home.
3. Populate the Name box with News.
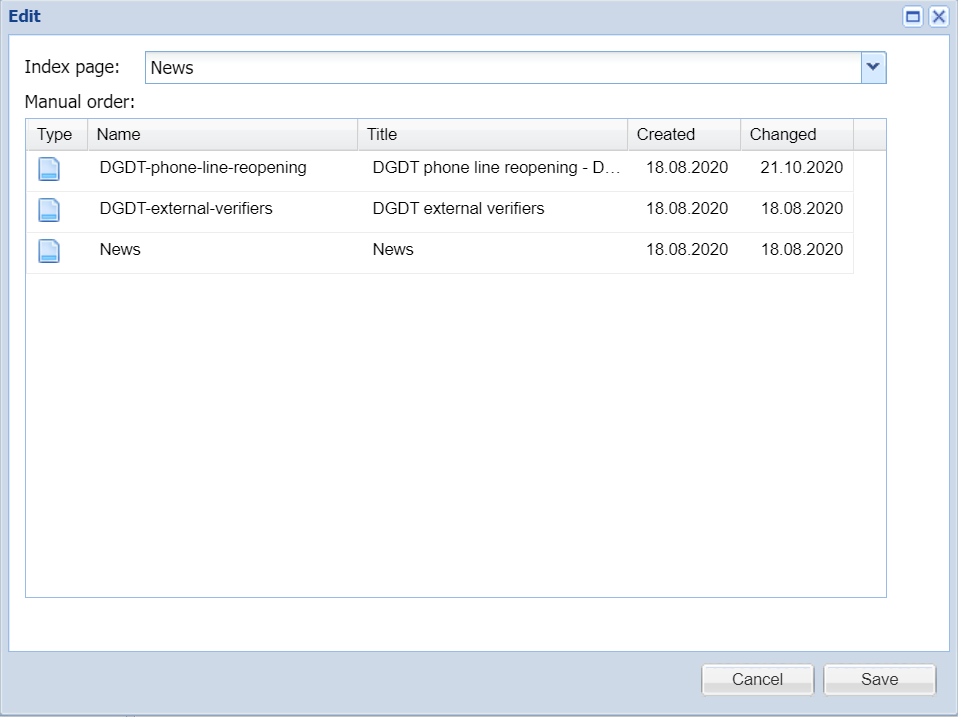
4. Save the page and Publish it.
5. Set the News folder index page as the news home page.
6. Save.
16. Create a search results page using a template
1. In the folder you created with the name of your site, select Create page.
2. Uncheck the Use default template box and select DGDT-search-results.
3. Populate the Name box with Search-results.
4. Save the page and Publish it.
17. Create a home page using a template
1. In the folder you created with the name of your site, select Create page.
2. Uncheck the Use default template box and select DGDT-home.
3. Populate the Content box.
4. Save the page and Publish it.
5. On the Home page, select and select Add to menu.
Add to menu creates a link to that particular page on the main navigation.
If you require a submenu, create a folder within the folder you just created and name it with the name of the link (e.g. Schools). Repeat steps 3 - 5 and don't forget to publish the folder.
18. Create a contact page using a template
1. In the folder you created with the name of your site, select Create page.
2. Uncheck the Use default template box and select DGDT-contact.
3. Populate the Content box.
4. Save the page and Publish it.
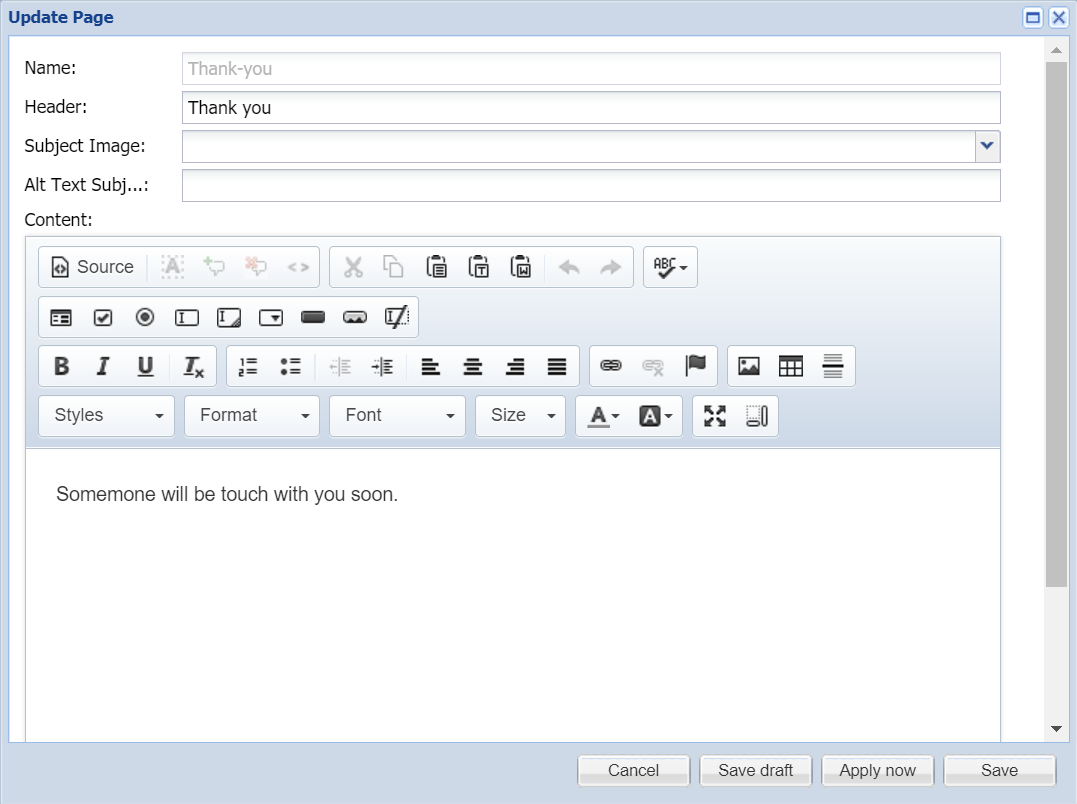
19. Create a thank you page
1. In the folder you created with the name of your site, select Create page.
2. Ensure Use default template is checked.
3. Populate the Content box. Name the page Thank-you.


 and register your site.
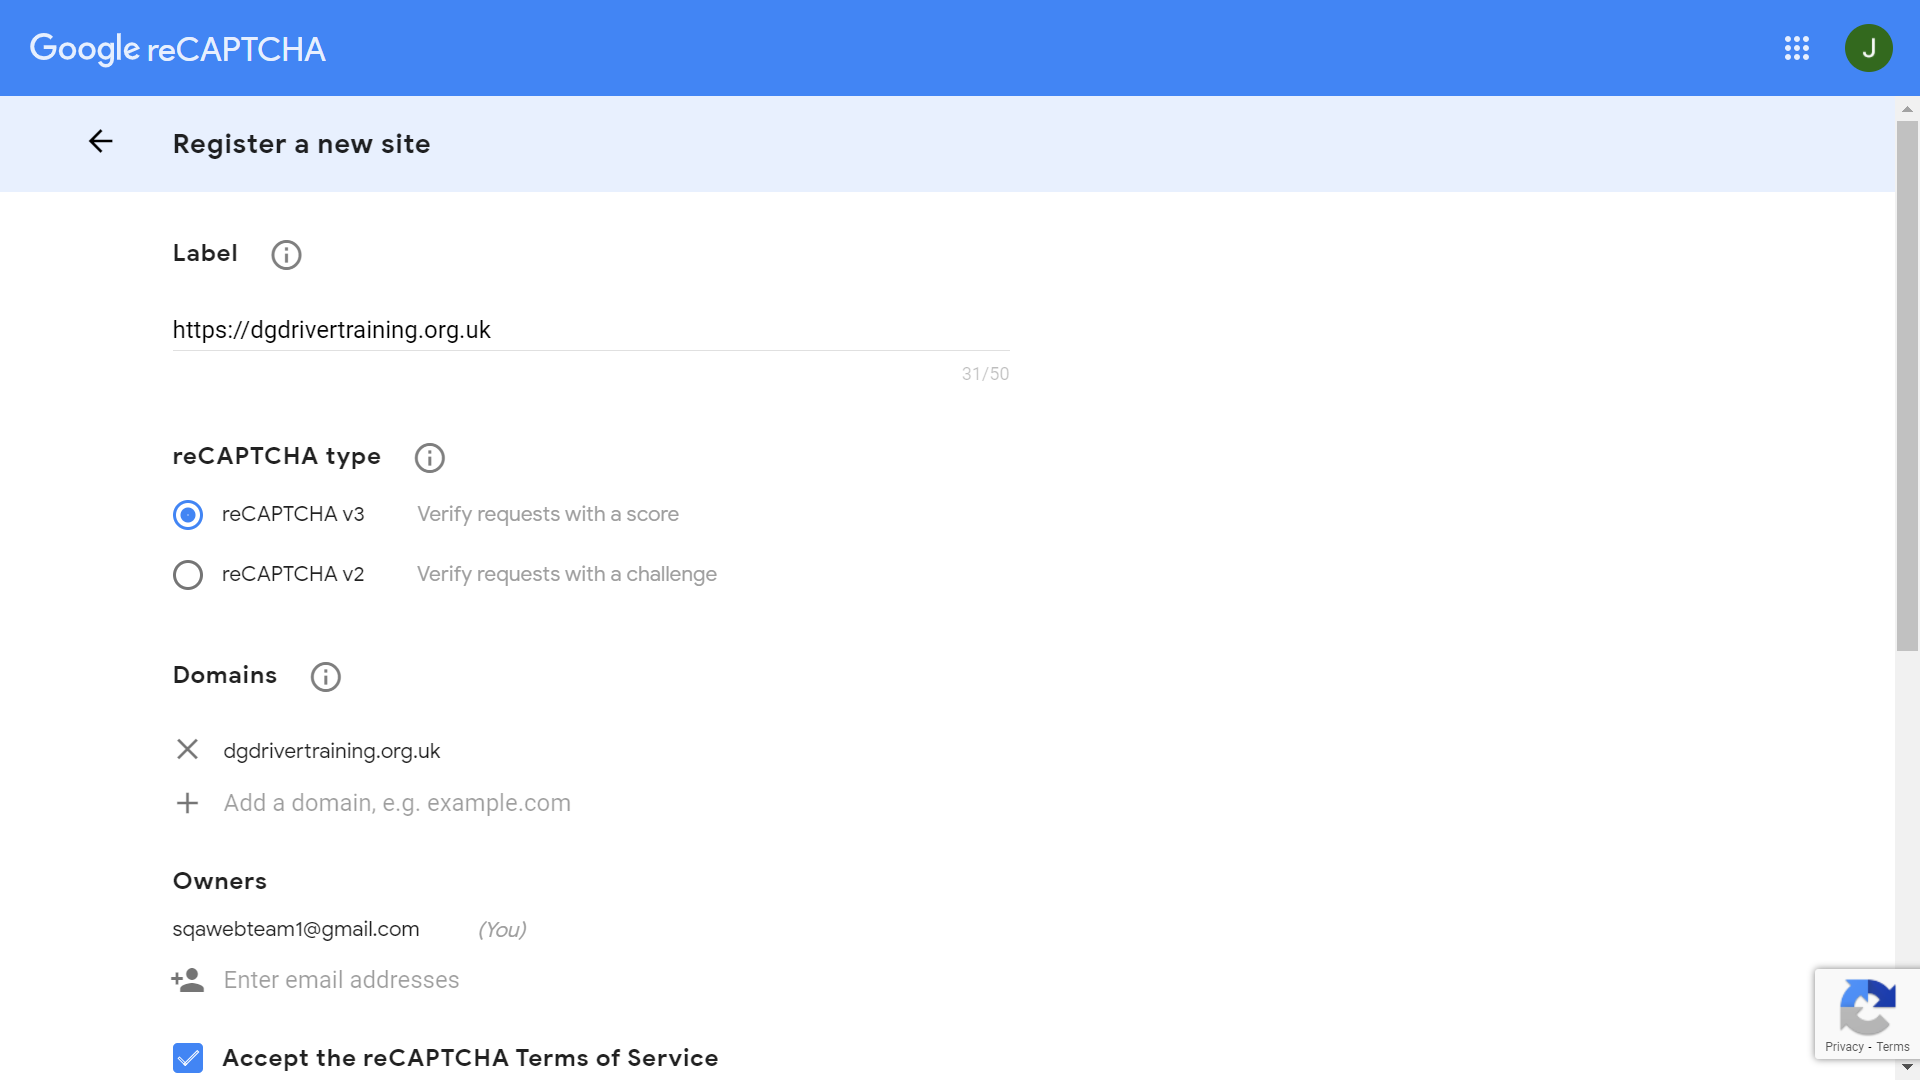


 and select Choose template and select the general template you created.
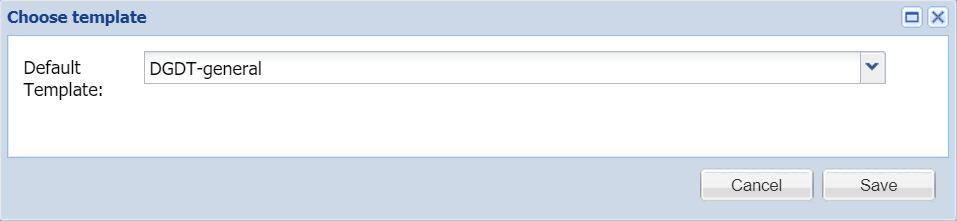


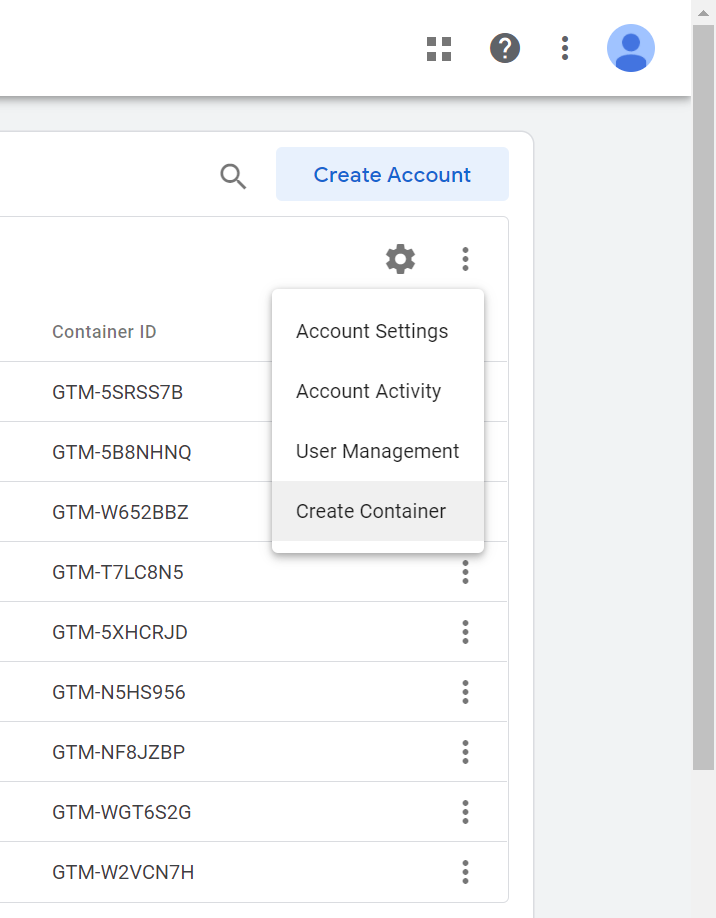
 and select Create Container.